Welcome to Raspberry Pi 🍓 Pico/Pico W Development!
If you're new to Microcontroller Development, this guide is crafted with your understanding in mind. We'll cover essential hardware and software information to kickstart your journey into the exciting world of Raspberry Pi Pico/Pico W development.
For additional resources and in-depth information, check the reference links provided at the end of this guide.
Hardware Information
Common Terms:
- RX (Receiver): Data reception point. For example, connecting a display at Rx.
- TX (Transmitter): Data transmission point to your Raspberry Pi Pico board.
- CSn (Chip Select): Indicates to which chips data will be transferred or received.
- SCK (Serial Clock): Synchronizes data transfer timings.
- SDA (Serial Data): Transfer of data takes place through this pin.
- SCL (Serial Clock): Equivalent to SCK.
Transfer Modes:
- Different modes (SPI, I2C, UART) listed with terms like RX, CSn, TX, SCK. For example, SPI0 TX indicates SPI interface, Mode 0, and used as a Transmitter.
Additional Terms:
- GND (Ground): 0 voltage drop.
- ADC (Analog to Digital Converter): Converts Analog Signals to digital (12-bit output, extendable to 16 bits).
- VBUS: Powers the board or modules with 3.3 V.
- RUN: Resets the board (not recommended for beginners).
- VSYS: System input voltage (1.8 V to 5.5 V) for on-board SMPS.
- V_ref (Reference Voltage).
- 3V3_EN (3V Input).
- 3V3_(OUT) (3V Output).
Software Information
Your Pico/Pico W supports programming in ASSEMBLY, C, C++, Micropython, and Circuitpython.
Getting Started with Micropython:
-
Download and Install Thonny: Thonny Download (opens in a new tab)
-
Connect your Raspberry Pi Pico/Pico W: Plug in your micro-controller board while holding down the BOOTSEL button.
-
Open Thonny IDE:
- Click on the right-hand corner "Local Python 3."
- Click on the right-hand corner "Local Python 3."
-
Install Micropython:
- Select "Install Micropython" and choose the latest variant.
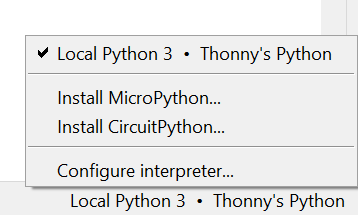
- Select "Install Micropython" and choose the latest variant.
-
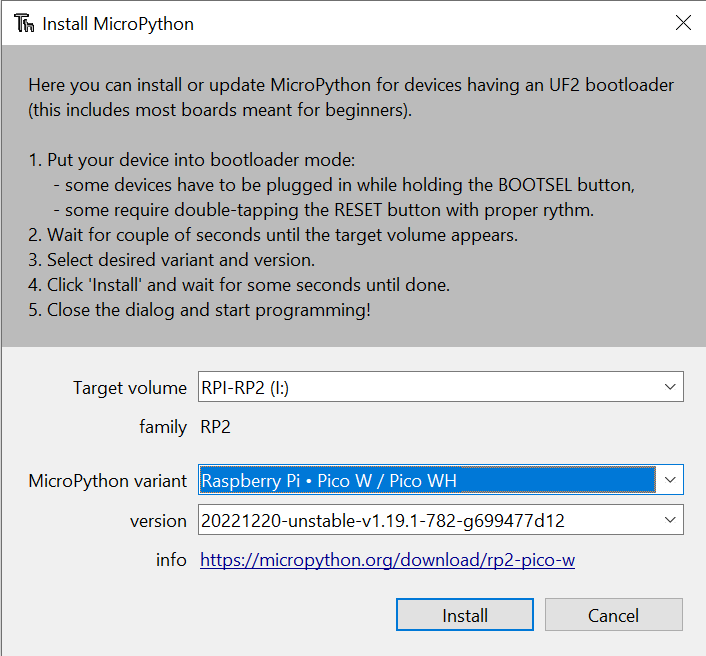
Click Install: The board will automatically plug itself in FS mode.
-
Close the Dialog Box: Your board is now ready for development.
-
Test with Blink Project: Verify that everything is working correctly.
Additional Setup for C/C++/ASM:
Check out the SETUP USING C/C++/ASM in !(Setup using C/C++/ASM)().
Happy Coding! 😃😃
Reference Links: